- A+
Introduction
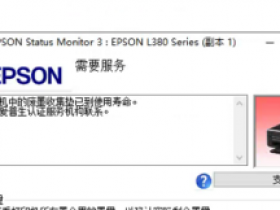
If you own an Epson L301 inkjet printer and use it frequently, you may have encountered a message notifying you that the printer's ink pad is full and needs to be replaced or reset. Fortunately, you don't need to spend money on replacements, as resetting the ink pad is a simple process that you can do yourself. In this guide, we'll show you how to reset the ink pad on your Epson L301 printer on a W7 operating system in under 50 words.
Step 1: Download the Reset Utility
The first step is to download the Epson Adjustment Program Reset Utility for your W7 operating system. You can find the reset utility on a website like Reset Key or the official Epson website. Download and install the reset utility on your computer.
Step 2: Open the Reset Utility
Once you've installed the reset utility, open it on your computer. Select the Epson L301 printer from the list of available printers and click "OK." Ensure that your printer is connected to your computer and is turned on.
Step 3: Reset the Ink Pad
On the reset utility's main screen, select "Waste ink pad counter" and click "OK." A dialogue box will appear, asking if you want to reset the waste ink pad counter. Click "Yes." Wait until the process is complete, and the utility will notify you that the counter has been reset.
Step 4: Test Your Printer
After resetting the ink pad, it's essential to test your printer to ensure that it is functioning correctly. Print a test page and check if all the colours are accurate and that the printer is working without any errors.
Conclusion
Resetting the ink pad on your Epson L301 printer is straightforward, and with this guide, you can do it in under 50 words. Always ensure you download the reset utility from a reputable website and follow the steps carefully to avoid any damage to your printer. With this simple process, you can continue using your printer without having to replace the ink pad.
- 我的微信
- 这是我的微信扫一扫
-

- 我的微信公众号
- 我的微信公众号扫一扫
-