- A+
Introduction
As printer users, we may often encounter the problem of waste ink in our printers, which can affect their performance and even lead to malfunctioning. One such printer that is widely used is the Epson 101, which is known for its high-quality prints and efficiency. In this article, we will discuss how to clear the waste ink in the Epson 101 printer.
What Causes Waste Ink in the Epson 101?
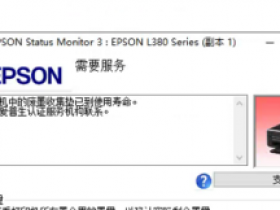
The Epson 101 printer uses a cartridge system that has an ink pad located under the print head. This pad serves to capture the excess ink that is not used during printing and is transferred back to the pad through a drainage tube. Over time, the ink pad becomes saturated, leading to waste ink accumulation in the printer. This waste ink can cause the printer to malfunction or stop working altogether.
Steps to Clear Waste Ink in the Epson 101
The process of clearing waste ink in the Epson 101 printer involves resetting the ink pad counter and cleaning the ink pads. Here is a step-by-step guide to help you through the process:
Step 1: Download and Install the Printer Reset Utility
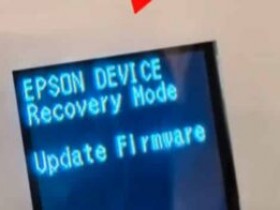
The first step in clearing the waste ink in your Epson 101 printer is to download and install the printer reset utility. This software is available online, and you can easily find it by searching for "Epson 101 waste ink reset utility" on any search engine.
Step 2: Open the Printer Reset Utility
Once you have downloaded and installed the printer reset utility, open the program and select the Epson 101 printer from the list of available printers. This will prompt the software to scan and detect the printer's ink pad status. You will see a message indicating the amount of waste ink present in the printer.
Step 3: Perform the Waste Ink Counter Reset
Next, click on the reset button on the printer reset utility to reset the printer's waste ink counter. This will clear the waste ink and reset the ink pad counter to zero. It is essential to note that after resetting the counter, the printer will still need to have its ink pads cleaned.
Step 4: Clean the Ink Pads
After resetting the ink pad counter, it is time to clean the ink pads. You can do this by disassembling the printer and locating the ink pads. The ink pads are usually located at the bottom of the printer, and you can access them through a removable cover.
Remove the ink pad holder carefully and wash them under running water until the water runs clear. Make sure to pat them dry with a clean cloth before returning them to the printer. You can also use an absorbent material like cotton to absorb the excess ink before washing them.
Conclusion
Clearing waste ink in the Epson 101 printer is an essential process that ensures the longevity and performance of the printer. By following the steps outlined above, you can easily reset the ink pad counter and clean the ink pads, ensuring your printer continues to work efficiently. Remember to clean your ink pads regularly to prevent waste ink buildup that can cause your printer to malfunction.
- 我的微信
- 这是我的微信扫一扫
-

- 我的微信公众号
- 我的微信公众号扫一扫
-