- A+
Introduction
Printers have become an essential tool for individuals and organizations to carry out their daily tasks efficiently. However, one of the problems that arise when using a printer is dealing with the waste ink produced during the printing process. While most printers are designed to handle the ink waste internally, some require ink collection bottles. This article will guide you through the process of installing the 850 waste ink bottle with ease.
Before Starting the Installation Process
Before beginning the installation process, it is essential to ensure that you have everything you need. Here is a list of things you will require:
The 850 waste ink bottle
The printer manual
A screwdriver
It would help if you also made sure to turn off your printer and unplug it before proceeding with the installation process.
Locating the Ink Collection Tank
The first step towards installing your 850 waste ink bottle is to locate the ink collection tank. The ink collection tank is usually located at the back of the printer, and for most printers, it is easily accessible. Check your printer manual to help you locate the ink collection tank.
Removing the Ink Collection Tank
After locating the ink collection tank, the next step is to remove it carefully. You may need to use a screwdriver to loosen the screws holding the ink collection tank in place. After removing the screws, gently pull the ink collection tank out of the printer, ensuring that you do not spill any ink.
Installing the 850 Waste Ink Bottle
Now it's time to install your 850 waste ink bottle. This process involves attaching the waste ink bottle to the printer's ink collection tube. The ink collection tube is a small plastic tube that transfers waste ink from the printer to the waste ink bottle.
First, check the waste ink bottle's bottom to locate the ink outlet nozzle, which is where ink will flow from the printer into the bottle. Align this nozzle with the ink collection tube, making sure that the tube is firmly inserted into the nozzle.
After attaching the waste ink bottle to the collection tube, carefully place it in the same position where you removed the previous ink collection tank.
Ensure that the waste ink bottle fits snugly and securely in place, then tighten the screws and make sure everything is in the right place before plugging your printer back in.
Testing Your Printer
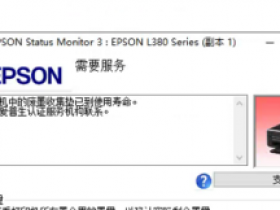
After installation is complete, it is essential to check that your printer is functioning correctly. Turn your printer on and check that it recognizes the newly installed 850 waste ink bottle. Most printers will display a message when the waste ink bottle is full and needs to be replaced.
Conclusion
With the steps provided in this article, installing your 850 waste ink bottle should be a breeze. Ensuring that you install the waste ink bottle correctly will save you a lot of trouble and keep your printer running smoothly. In addition, replacing your waste ink bottles regularly will help reduce the environmental impact of wasteful ink disposal.
- 我的微信
- 这是我的微信扫一扫
-

- 我的微信公众号
- 我的微信公众号扫一扫
-